Battle of Geel
| Battle of Geel | |||||||
|---|---|---|---|---|---|---|---|
| Part of the Liberation of Belgium during World War II | |||||||
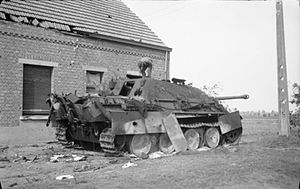
 Destroyed German Jagdpanther near Geel, 13 September 1944. | |||||||
| |||||||
| Belligerents | |||||||
|
|
| ||||||
| Units involved | |||||||
|
50th Division 15th Infantry Division Sherwood Rangers Yeomanry |
II. Fallschirmjäger Regiment Panzerjäger Abteilung 559 | ||||||
| Strength | |||||||
| Unknown (at least 2 divisions) | Unknown (at least 3 regiments) | ||||||
| Casualties and losses | |||||||
| 1,700–2,000 killed, wounded and captured | 2,000–2,500 killed, wounded and captured | ||||||
| 130 civilians killed | |||||||
The Battle of Geel, also known as the Battle of the Geel Bridgehead, was a battle between British and German troops near Geel (Gheel) in Belgium. It occurred between 8 and 23 September 1944 and was one of the largest and bloodiest battles to occur during the first phase of the Liberation of Belgium.
Battle
The first phase of the fighting took place at the Albert Canal, south of Geel, on 7 September. On the German side of the Canal was Kampfgruppe Dreyer of the 85th Infantry Division on its way to be reinforced with two Luftwaffe Regiments.
On 8 September, the 50th (Northumbrian) Division attacked across the canal. The 69th Brigade crossed over and later that evening the 151st Brigade had established a bridgehead. The Germans counterattacked repeatedly but by morning on the 9th the two bridgeheads were connected which allowed armoured cars to cross over. By evening on the 9th, a Bailey bridge allowed the Sherman tanks of the Sherwood Rangers Yeomanry to also cross.
Gheel
On the 10th, the 6th Durham Light Infantry of the 151st brigade supported by the Sherwood Rangers then pushed into Geel. They took up positions around the marketplace, while the German defenders of the city centre retreated to north of the rail station; by mid-afternoon the center was secured.[1]
Later on the same day, the German forces in the area composed of elite Fallschirmjägers and Jagdpanther tank-destroyers of Panzerjager-Abteilung 559 made its presence felt with more or less continuous attacks supported by infantry. The next day a full attack inflicted heavy losses on the British forces in the town and the Germans briefly recaptured the center of Geel.[2] The 151st were forced to withdraw to their initial positions at the Albert Canal. The Germans however pressed their counterattack too far and in return suffered heavy losses, a result of which forced them to abandon the town for a second time.[1]
On the 12th the badly battered 50th Division received orders to pull out and move to the recently captured Joe's Bridge, to free Guards Armoured Division to spearhead Operation Market-Garden.[2] On that same day, the 50th Division was replaced by the 15th (Scottish) Division.[2]
During the night of 13 September, the Germans having feared encirclement and attack from the rear pulled back behind the Maas-Scheldt Canal in the village of Ten Aard. Troops of the 15th Division then reoccupied the town with only light resistance.[3]
Bridgehead
Once Geel was recaptured the next objective aim was to form a bridgehead over the Maas-Scheldt Canal at Ten Aard in order to give the Royal Engineers the chance to create a pontoon bridge and to ferry heavy equipment.
After eight days of heavy fighting the Scots secured a bridgehead that was repeatedly counter-attacked by the Germans. All assaults were repelled but the Scots were unable to advance any further.[4] The bridgehead was no greater than 900 meters long and 900 meters wide. Each time the Scots tried to expand the bridgehead they were met by heavy German counterattacks. Fighting took place until the final German withdrawal on 23 September and Ten Aard was finally liberated.[3]
Aftermath
Strategy had changed so that operations were being used in conjunction with Operation Market Garden. The Germans had to withdraw to counter the Allied threat. At the same time the Allies had to make further efforts in the East to divert German troops from the offensive.[1]
The 53rd (Welsh) division had forced a crossing of the Jonction Canal near Lommel, where it then fought hard to expand the salient south of Eindhoven. This was the new starting point for British XII Corps to support the Garden (ground) offensive.[3] The Ten Aard bridgehead became unimportant after the German withdrawal and the Scots troops withdrew from the bridgehead in order to be able to prepare for other fronts further to the east.[5]
The exact casualties during the battle are unknown. At least 130 civilians were killed,[citation needed] mostly due to allied and German artillery fire. The total number of deaths was probably between 1000-1100,[citation needed] with the number of wounded significantly higher.
References
- Bibliography
- Bennett, David (2011). A Magnificent Disaster: The Failure of Market Garden, the Arnhem Operation, September 1944. Casemate Publishers. ISBN 9781935149972.
- Converse, Allan (2011). Armies of Empire: The 9th Australian and 50th British Divisions in Battle 1939-1945. Cambridge University Press. ISBN 9780521194808.
- Delaforce, Patrick (2004). Monty's Northern Legions: 50th Tyne Tees and 15th Scottish Divisions at War 1939-1945. History Press Ltd. ISBN 978-0750935562.
